Showing posts with label Postcard Swap. Show all posts

Monday, May 19, 2014

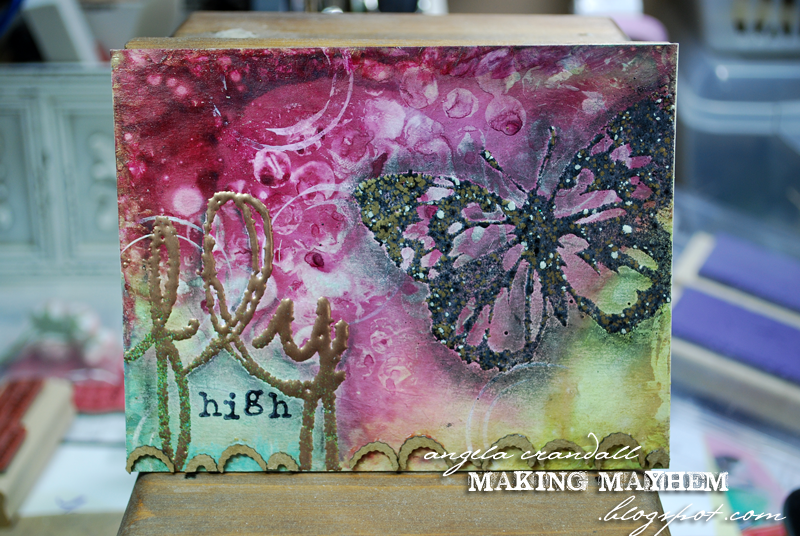
Globecraft & Piccolo - Altered Postcard "Fly" Tutorial

[edited to add: find the how-to video below!]

Happy Monday, Friends!

This week I have a fun project  - an altered postcard using Globecraft & Piccolo Embossing Enamels, Gel and Piccolo Accents. You can use an actual postcard or cut your own bases from cereal boxes, chipboard or even just cardstock. Remember when I suggested you keep all the bits and pieces you weed from the main Piccolo Accents?


(I actually took video while I created this postcard (having some difficulties uploading the video), so keep an eye out for an update to this post and WATCH how this project came together! )

Gather your supplies and watch for the update. You may surprised at how easy this is!


Globecraft & Piccolo supplies:
Enamel Powder Adhesive Fluid
Embossing Enamel Temple Stone
Embossing Enamel Vintage Copper
3D Enamel Gel - Satin Gold
Glastique Gloss
*Leftover bits from French Oval Frame Kit

other supplies:
Distress Ink - Vintage Photo
Archival Ink - Jet Black
Adirondack Color Wash - Cranberry
Tattered Angels Chalk Sprays - Banana Pudding, Peacock
Heidi Swapp Color Shine - Citron
White Gesso or white acrylic paint
Found Items: bubble wrap, tape roll

*you can use any leftover bits from your Piccolo Accents and frames. I save all my bits & pieces in a reclosable baggie and pick through them when I need something.

Here are the basics:

1. Spray colors. Let dry (or use a heat tool to speed it up!)
2. Use Found Items to add interest.
3. Paint edges using 3D Enamel Gel.
4. Emboss butterfly and 'fly' using Embossing Enamels.
5. Stamp 'high'.
6. Distress edges using Vintage Photo.
7. Add Piccolo bits using Glastique. Let dry.

That's it! Don't forget - if you create a project using Globecraft or Piccolo products, we'd love for you to share it on our Facebook page!

Inky hugs,
Angi

Monday, January 20, 2014

Globecraft & Piccolo - Altered Postcard with Adhesive Drippage

Happy Monday, friends!

I've got a fun project to share - an altered postcard! When was the last time you sent some art through the mail? Well, I won't be mailing this postcard without an envelope, but it's definitely more interesting with a few additions from Globecraft & Piccolo!


I started off with a leftover altered postcard I had.

You can see how I make the postcard bases HERE & HERE.

I dabbed on some Enamel Powder Adhesive and then embossed the filigree heart and the key from the A114 Keys to My Heart set with Royal Sterling - this is a stunning mix!


One of the last details I added - 3D Enamel Gel (Mars Black) into the keyhole. It's all in the little details, isn't it?


Here is a piece of the set A100 Steampunk Airship Accents. (My daughter thinks it looks like an owl...we may have to design a project with that in mind some time...) This is embossed with Aged White. Note that this is a tiny piece and the Aged White is a chunky powder. A little goes a really long way here!


These pieces are even tinier...dare I say 'micro'? They are from A138 Micro Flourishes. I decided to only emboss 2/3 of the mini flourish and then coated it with Glastique Gloss for some shine. The Glastique over the plain book board deepens the color. I like the look!


To make the Royal Sterling drippage, I carefully opened the Enamel Powder Adhesive and poured just a bit on my craft mat. Then, I used the end of a cheap paintbrush and preceded to dip and drip on the postcard, pulling the drip down the card.


Tip: use less Enamel Powder Adhesive than I did in the picture! 

Add some more Royal Sterling Enamel Powder & get to melting! As things cooled, I added them to the postcard. I used the Glastique to adhere the the vellum cardstock (the piece with the sentiment) under the ribbon. All of the small accents were adhered using Glastique, too.

Well, I hope that you enjoyed this project today and will stop by the G&P blog. I would suggest tomorrow to see what crafty goodness Tracy will bring! ;)

Inky hugs,
Angi

Tuesday, November 26, 2013

Postcards - Prepping the Bases


I'm still working on organizing my studio. I know. It's been about 4 months since my stuff arrived and about a month since I've really been creating on a regular basis. Most of my things are in places, but since I've started working in the studio, I've realized I need some major tweaking to improve my workflow (pictures of the 'workflow' tomorrow!)

Stamp storage and lighting are at the top of my list. When that happens you may actually be able to watch projects from start to finish! I love watching others create and I'm excited about sharing my how-tos with you!


Okay...onto the postcards bases. I followed a similar process for my first iHanna Swap. You can see those posts here:


I started out with some glossy 4.25"x5.5" postcards I had around. (I have ALOT of these. I used to be a SU! demo years ago and had hung on to these just for such an occasion! I used these in 2011, too. I did say 'ALOT'!)

I had already started making bases when I remember to take the photos!

I used some fine grit sandpaper and sanded the cards in one direction and then the other. I wasn't trying to take off the entire layer; I wanted to give the layer some tooth so that the next layers would stick.

The sanding left this great crosshatch design. Very Vintage.
Now for the first layer: gesso. I save old gift cards, credit cards, and even those thin cardboard coupon/discount cards. They are fabulous for laying down a thin layer of paint, gesso, gels, etc. Scoop a dab of gesso onto the postcard and then use the gift card to spread it out.

With the gesso I use (whatever's on sale at my local craft store) I have to use a very thin layer, if I want it to be smooth. Otherwise, when it dries it will have cracks. I used thin layers first and then varied it a bit on the last layer.


Don't worry about cleaning off the card. It just adds more variation.
Be sure to let each layer dry in between for the best layered effect. It usually only takes about 10 minutes, if it's thin. When dragging the card to spread the gesso, the edges left lines and marks. Leave them! They add great texture and interest.

Love this layer!
Gesso layers: done! Notice that I didn't completely cover the original layer. It's peeking through! Amazeballs, right?! The postcard is already looking kind of artsy.

Now I wanted to add some text. Here's my En Francais stamp from Stampin' Up! It is my most used script stamp.

I used Archival Ink because I knew I would be adding more water-based mediums and didn't want the ink to smear. However, I did want the script to be lighter and heavier, so when I inked up the stamp I randomly pounced it on the rubber.

The gesso layers are already textured, so when I stamped it the script varied. I stamped it once and then turned and stamped it again without reinking. Then I set it aside, did the rest of the postcards and then took a second look. If it needed more, I added more.

I put the decal on upside down!
The bases took about two hours (I made about 20 bases.) including dry time. I worked assembly line style. I did the first layer on the first card, then moved to the second card, etc. By the time I got to the last card the first card was almost dried. Then I repeated the process for the next layers. This really works well when prepping the bases (or any kind of project you are working on in multiples!)

Does it look anything like it did? Gorgeous transformation!
I really enjoyed prepping the bases. I watched a few episodes of Masterchef and tried not to think too much about it and just work the process.

This is definitely a project you just need to get busy and do it! You may be surprised at just how good your bases look! And just wait until you add more layers...

More postcard goodness coming soon!

2013 (Autumn) iHanna DIY Postcard Swap


Inky hugs,
Angi

Sunday, November 24, 2013

2013 iHanna DIY Postcard Swap - The Quickie. More to Come!

embossing powder, dimensional pearls, gesso, Gelatos, washi...oh my!

Hello, Friends!
I am so excited to share my postcards from the 2013 iHanna DIY Postcard Swap! This year I swapped 10+1 cards; this is my second iHanna Postcard Swap. If you are interested in exchanging postcard-size pieces of artsy goodness, be sure to sign up for Hanna's newsletter to be one of the first to know when she opens the next swap!

Instead of posting all of the cards in one post, I'm going to spread the love around a bit and share a couple at a time over the next few weeks with detailed posts. (I will upload all of the cards to my flickr & instagram accounts this weekend.)

Today I'm sharing one card to get started. Be sure to stop by Tuesday to see how I prepped all the bases and my basic process.

I can't even tell you how much fun it was to make these cards! I am still amazed how the layers build up and the finished product is always better for it. This year I signed up at the last minute, so I was a little pressed for time. I decided to use the same steps for each card and vary the details.


I always wonder what the process looks like for a piece of art. Since I'm not quite set up for video, yet, I took a few pictures, so YOU can see where I started. Above you see the base with scribbles of Gelatos. Not much to look at.


I chose a few colors of sprays/mists and spritzed the cards and used my fingers to moosh it all around. (I'm pretty sure that's a technical term...) Looks better, right?

After letting it dry. I added quotes and phrases using alphabet & other stamps and embossed them with black embossing powder. LOVE the texture and the shine the embossing adds!

(Check out this ornament I made last year...or This ATC - embossing enamels, powders, and crackle accents can make a good project great!)


After the stamping and embossing, I used Adirondack Dimensional Pearls to add more color, shine and glimmer. I squirted a dot or two and then used my fingers to spread it like paint. Using multi-medium gel I added various Frantage Mica Fragments where ever I felt I needed some glam.


After all of that I still feel it needed a bit more, so out came the washi tape! A little bit here, a little there...done! (I wrapped the washi around the edge on to the backside for interest. Sorry, forgot to get a picture!)

Here is the stack before I mailed them... Make sure to click on the pictures in this post to see more details. Feel free to leave a comment, if you have any questions or feedback! And don't forget to check back on Tuesday to see how I created the first couple of layers...

2013 iHanna Postcard Swap (Autumn)

Inky hugs,
Angi

Monday, May 2, 2011

Postcard Swap [3] - The Finished Postcards

Wow. iHanna's 2011 Postcard Swap was great fun! It was just what I needed to help me out of my creative rut and get moving to more creative endeavors. This is a picture heavy post! (click on any of the pictures to see the postcards in detail)

The Group Shot

I thought about doing a couple of photos today, tomorrow and so on until I showed them all, but I've already been working on other projects to share, so here they are - all my postcards (and a few extras!)

The Addressees (finished the postcards with a kraft cardstock backing)

So true.
It's always the first steps that seem the hardest!

Love this quote.


Mini staples make the 'silver lining'

This one might just be my favorite...colors, texture, the quote.

Had been looking for a project to use this stamp on for awhile. Glad to have found one. If I hadn't needed to mail this, I would have left the flower whole (I was worried it would get ripped off in transit.)

I made a batch of these stamped, embossed butterflies on white cardstock & color with inks/shimmer/colorwashes when needed.


 LOVE LOVE LOVE this quote.

Picture definitely didn't do this one justice. The shimmer and color
are so much more rich and vibrant IRL.

This one spoke to me. Almost kept it!
Thinking I will recreate something similar on canvas.

The heart is crinkled and ironed vellum...the heat caused the raised (crinkled) parts of the vellum to melt and puff, when it cooled and settled it was almost like embossing.

This was an extra background. Loved the 'fire' in this one.

Another extra. Was playing around with a few more techniques. Fun colors!

Now that I have a better idea what the Post Office is willing to accept, I'll be more daring in next year's swap! I hope they all arrived a little travel worn, but still in intact!

Inky hugs,
Angi

Friday, April 22, 2011

Postcard Swap [2] - More Layers

Busy week. So many things on the 'to do' list and not enough time to get them done. This post, however late, will be checked off the list! (note: picture heavy post! click the pictures to get a better view) In case you missed it, click HERE for my first 2011 ihanna postcard swap post.

Okay, so here's where we left off...layers of gesso and newspaper... I had no real plan as I was making these. I had an idea of what I wanted the finished piece to look like, but wasn't sure how I was going to get there. 'The Plan' evolved as I tried techniques, played with product and drank lots of hot chocolate with whipped cream (needed the caffeine - my excuse, anyway!)


I wanted more color, so out came my Adirondack Colorwashes. Sprayed a few times...loved the color, but somehow it wasn't enough. (using Eggplant) After a a bit of consideration, I had decided that my postcards would be different colors. (At this time I had 12 colorwashes. I only needed to complete 10 postcards, but hey, what's 2 more?!)


Thought it needed more texture. White acrylic paint...put a bit on the craft sheet and sprayed it with the colorwash. (I didn't mix it.)


Used cut up sponges dipped in the paint/colorwash mix and dabbed it over the entire card. (using Wild Plum) Don't forget you can pick up what's left on the craft sheet with a  manila tag, cardstock panel or even fabric and build up your stash of papers, tags and fabric for that next project!


I did forget to take a picture when I started to apply the shimmer sprays! After I applied the paint/colorwashes, I waited for them to dry overnight. (I could have used the heat gun to speed up the dry time, but I didn't want the paint to bubble, if it got too hot.) I sprayed each of the cards using a coordinating color of some kind of shimmer spray : Glimmer Mists and Perfect Pearls Mists. This added more colors and a wonderful depth and richness to the backgrounds!

The mists dry so quickly, so I hit them with the heat gun. Next, I got out the water and spritzed a piece of bubblewrap and 'stamped' it over a section on the card. Wetting the colorwash reactivates it and the color in the wet areas began to migrate, leaving the bubblewrap images. I left it for about 5-10 seconds (until I liked what I saw) and then dried it with my heat gun to stop the process and leave the imprint. (If you leave it to air dry, you will lose some of the definition as wet color tends to blend outward and will become softer in appearance - sometimes desirable!)


By not cleaning the bubblewrap between postcards, I was able to introduce more color onto the next postcard without much fuss. Notice the clean craft sheet? (check out the above photos, if you didn't...)


Bonus Picture! I've been asked many times just how easy is it to clean a teflon craft sheet...

You won't believe how easy!

Have a trash can nearby. Liberally spray the sheet with water. Give it a sec or two and then grab that used iTunes, gift or credit card and simply (gently) scrape off the mess! You won't need much elbow grease to move off whatever was on the mat.

Seriously. Melted embossing powder, glue, acrylic paint, adhesive...just scrape it off the mat into the can! Give it one more spray of water and wipe clean. (I use bar mop-type towels. Washable (in their own load) and reusable. I love using my artsy towels - they just add color to my studio!)


I was really liking how these were turning out! Tried a little more texture on a few postcards using gesso and some found items (that plastic ring is what's left when you finish off a roll of clear tape. And yes, that is a crayola...ahem...borrowed from my kids paintbrush...) but for the most part I was pretty pleased!


Another night to dry well. More texture. I was getting down to the wire on time, so I made the decision to finish off the cards in similar ways while making each one unique. Here I stamped the Paris collage, turning it various ways, not being careful to ink the entire stamp so that it left gaps and lighter text in some areas. (stamped in black Archival Ink) I only stamped over a portion of each postcard.


The Archival Ink is waterproof, so I was able to use a few more techniques on the cards before I called them done. I swiped some of the edges with extra spray, paint or gesso. Even added some drippage with the colorwashes...I flicked water or color onto some...basically just played around with each postcard until I loved what I saw.


Whew. Still with me? It's 0025. That's as in a.m. I'll get my finished postcards on here soon. And the rest of the postcards I received, too!

If you have any questions, let me know!

Inky hugs,
Angi

(If you're reading this post on Facebook, please visit my blog http://makingmayhem.blogspot.com to leave a comment!)

Wednesday, April 13, 2011

WOYWW #8 (97)

Yes - 3 weeks in a row! Welcome to another edition of What's On Your Work desk Wednesday! Where we get to be a little voyeuristic and peek into someone else's creative haven. Want to know more? Check out the Queen of Sharing - Julia Dunnit - and join in the fun!

I've been really busy, but wanted to make sure to get my post up on time. Prepping for my upcoming classes, helping the kids finish science projects, history projects, end of the year stuff...busy.

But not too busy to want to share my finished postcards and even a couple I've received! So, to start off here's my work desk...


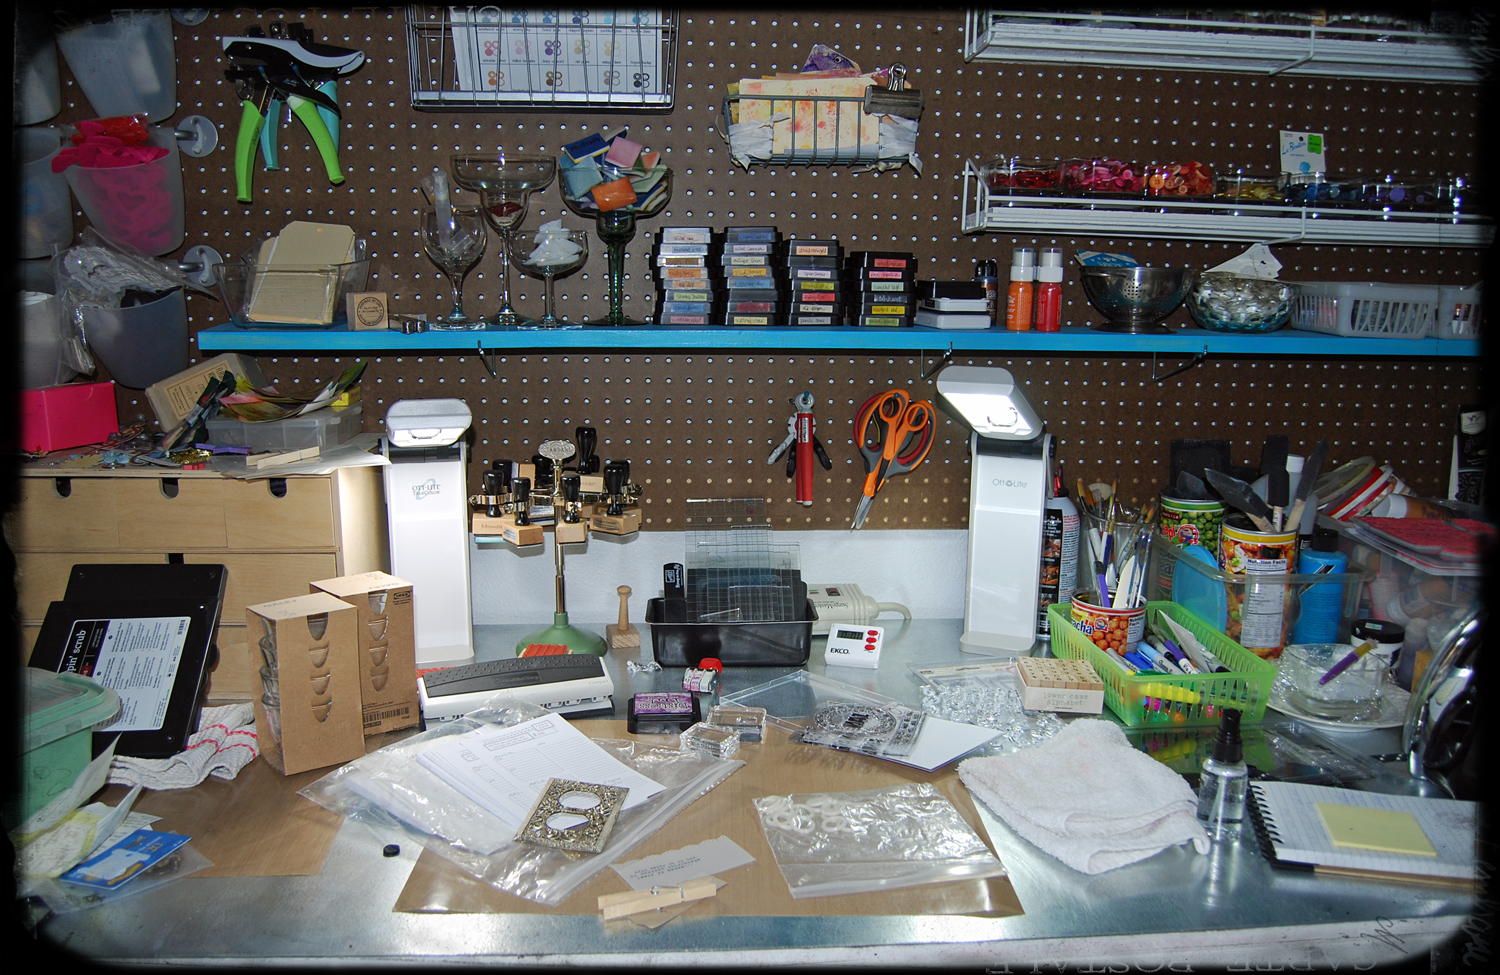
If you've seen some of the older photos you'll notice that I've done a little rearranging. That blue shelf was made for me by The Big Guy when he built my punch shelves with the kids (thought I had posted a picture...guess not...maybe next WOYWW!) I've been wanting to move my Distress Inks and some things I use often to a place that was easily accessible and easy to put away. I'm really a bit of a piler/clear container kind of gal. Notice the glasses with the foam & felt? the one with my mini misters? the one with misc. ephemera? and what about my buttons? You get the idea...the other day I had been cleaning out one of my shrunks and found some French jelly jars...pulled those out and put them on a shelf. Will be filling those soon, too!

Pretty random stuff on the desk...needed to finish my planner pages for the next couple of months, so they are on the desktop, along with some IKEA votive holders (glass, of course! The IKEA in Denver is supposed to open this fall...woohoo! These ones are from Koln...)

I know some of you have been waiting to see the postcards. I have to finish processing my pictures, but here's one I received from Stephanie in New York.


She says, " ...This postcard began as a photo, which I took of the Empire State Building. I was driving home from work and was stuck in traffic on 34th St. near Macy's..."

Love that this postcard came with a story! Thanks, Stephanie A.

My second postcard has made quite the trip...all the way from the Netherlands! Isn't she pretty? This one is from Deezy. You can find her HERE.  She's busy!

I couldn't believe that the postcard had come with the ribbon on the front. Wondered how that went at the post office...


I did find out...when I went to mail my cards I learned a few things about mailing stuff. When I designed my cards, I was worried that they wouldn't mail it without an envelope if they were too thick or heavy. (What would be the point of that? I wanted my postcards to weather the process and look traveled!) Well, if it weighs too much or is too thick you are not required to put it in an envelope, but they will charge you as if it were an unusual sized letter. Most of my postcards cost a little over a dollar to send.

While I would love to show how I finished up my postcards it's almost 0100 here. That will have to wait for another post.

Thanks for stopping by!

Inky hugs,
Angi

Wednesday, April 6, 2011

WOYWW #7 (96) - Postcards, Puppies & Static

Yikes! It's already WOYWW again...sigh. I look forward to Wednesdays, even if I'm not able to get a post out. Why?

1. What's On Your Work desk Wednesday
(Stop by Julia's to see what this fuss is about...it's great fun and inspiration!)

2. It's not Monday.
There's just something about the first day getting back into the schedule that takes a little more oomph! to get that momentum going for the week.

3. It's Hump Day.
We're almost 1/2 way through the week. That puts us closer to the weekend. Obvious, I know. I really enjoy hanging out with my family.

Since I'm talking about family...here's an update of the puppy...he had The Surgery and is wearing The Cone of Shame also know as the Puppy Handle (as in "Grab him!" as he escapes the kitchen) or the "Can We Take the Stupid Collar Off?!" when he runs into you from behind, bumps the back of your leg and then clotheslines you as he attempts to apologize with kisses.


Don't you just love the 'electric puppy' look? It's bad enough when he runs into you, but it's downright funny to see him run into someone else & zap them! It's been a tough week for the puppy. We've got the bruises and scrapes to prove it!

Okay...on to the work desk pictures! I'm finishing up my Postcard Swap. Nothing like creating under pressure! If you want to see where I began, click HERE.

The desk...yes, I create in the middle of mayhem...almost always. I like having everything nearby and available. I try to do a quick clean up and a little reorganizing the night before I craft. (Most of the time I have to schedule in the play time.) Next upgrade to the studio will be a double sink & drainboard!


Still wearing gesso and ink on my fingers. My paper towels and baby wipes (I will one day post about how I upcycle those...), my postcards, a canvas I started (itching to get to that), a gift I'm working on...always something to do.

Here's a sneak peek at a few of the unfinished postcards...I'll post more about my process later this week.


As I was sitting here reading over the post, I see that my ink and dip pen are in the picture...before anyone asks...no, I did not write the script on the postcards! I have Tim Holtz to thank for that! It's one of the stamps from...okay...I thought I'd share the name of the set, but I can't find it on the desk! LOL

I think it's the Papillon set...the one with the butterflies...

Thanks for stopping by today!

Inky hugs,
Angi