Monday, April 28, 2014

Globecraft & Piccolo - Organizing Embossing Enamel Powders

Happy Monday, Folks!

Have you ever noticed that when it comes to Embossing Enamels that what you see in the jar may not be what shows up on your project after you add heat?

This week I have an organization idea for all of your Globecraft & Piccolo Embossing Enamel Powders!

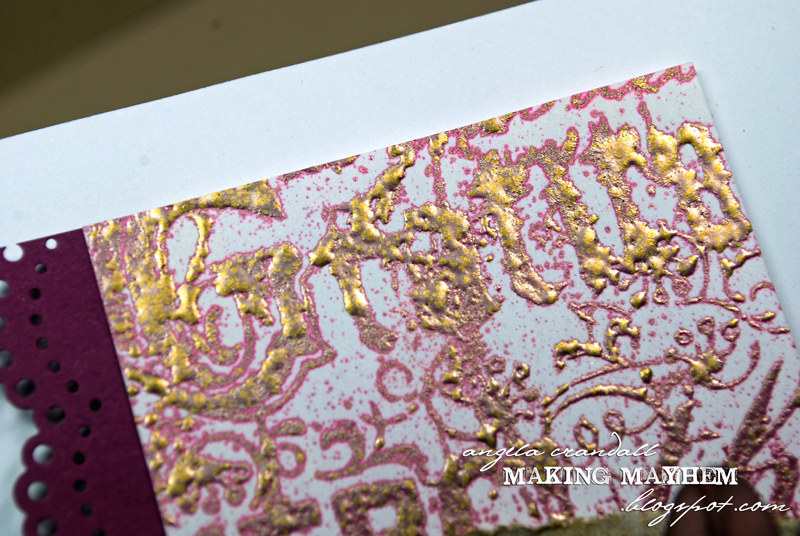
This picture shows what the Ruby Red Embossing Enamel Powder looks like in the jar, on the table and after heat has been applied.

The melted powder looks very gold here due to the glare from the light. See the sample below.
What a difference!

Apparently, I must really like the gold toned powders!
Sometimes after I have melted a powder, I don't remember which one I used, so to prevent that from happening (again!) I started making a sample of each of my melted powders and adhering them to the jar lids. A 1" circle punch is a perfect fit!


Now that I've made the samples, I can organize the powders by tones, colors, those without glitter...whatever suits my needs!

Quite often it's the little things that help us get by. In this case, taking the time to sample my Embossing Enamel Powder colors saves me time and prevents me from using the wrong color (and helps me to see that I need a few new colors to round out my supplies!)

Next in my quest for studio [re]organization is to make samples of the Embossing Enamel Powders on dark cardstock...

How do you organize your Embossing Enamel Powders?

Don't forget to stop by tomorrow for more Globecraft & Piccolo inspiration!


Monday, April 21, 2014

Globecraft & Piccolo - Embossed Glassine Bag


Happy Monday!

I have a quick and easy gift wrap idea for those small items when you want to give a friend a little something and want to dress it up a bit. Glassine bags! The best kind to use are the kind that are labeled 'dry wax' as ink won't sit or bead up on the surface of the bag as much. This makes drying time much quicker - less smearing!

Let's take a look at the supply list:

Globecraft & Piccolo:

Floral Eggs (set of 15) LA108


Other Supplies:
decorative stamps (Stampin' Up!)
misc. stamps (Studio Calico, Technique Tuesday)
scrap patterned paper
pearls, various sizes
twine
ribbon

Stamp the bag with small circles. Stamp the big circle using the Embossing Adhesive and Mardi Gras Embossing Enamel. Cut a circle out of the scrap paper and adhere to the bag.


Dab the Embossing Adhesive over the Floral Egg. Emboss. Royal Sterling Embossing Enamel on one of the Floral Eggs is gorgeous! Purple with gold, silver and micro glitter. I even sprinkled a little here and there over the bag and the embellishments... 


And then there's a close up of the Embossing Enamel in Mardi Gras...look at that shine! Adhere the Floral Egg and the rest of your elements. Make it pretty!

Tuck in your little gift and finish it off with a glossy bow on top to close the bag.

Cute, right?

Monday, April 14, 2014

Globecraft & PIccolo - Altered Clipboard

Welcome to another Happy Monday! Time for another Globecraft & Piccolo project.

Altered Clipboard - Globecraft & Piccolo Embossing Enamels and Accents

I love a good altered project - upcycling something you would normally throw in the trash bin...like when the clipboard you left on the floor gets stepped on "just right" by a little someone and ends up looking like this:


Here's what you'll need today:

Globecraft & Piccolo Supplies:
Enamel Powder Adhesive Fluid
Embossing Enamel Aged White
Embossing Enamel Poodle Skirt
Embossing Ename Pure Platinum
Bling on a Roll Silver
1/8" Super Sticky Tape
Daisy Floral Accents & Frame (A129)
Daisy Teardrop Earrings (C124)
E6000 Industrial Strength Glue Mini
scrap bookboard

Other Supplies (most of these items you probably already have!):
acrylic paint White
washi tape
silver jump ring
clipboard
sandpaper
Stampin' Up Classic Ink Pad Rose Red
Stampin' Up Classic Ink Pad Pear Pizzaz
sponge or blending tool
Tim Holtz Perfect Pearls Mist Pearl
alphabet stamps
1/8" hole punch

I decided to cut the clipboard close to the break. Using a ruler and a hobby knife I carefully sliced off the bottom portion of the board, leaving about an inch past the clip.


This took a little bit of time, but it was worth the almost smooth cut line! Gently sand the cut edge.


Paint the board and clip using white acrylic paint. Once dry, ink the sponge with the Rose Red ink and distress the edges. Using a clean sponge, with the Pear Pizzaz, randomly add the green. Spray the entire board with the Pearl mist. Let dry.


Using a leftover piece of book board, stamp the word 'art'. Cut out. Using the Adhesive Fluid and the Platinum Embossing Enamel, edge the word piece. Punch with a 1/8" hole punch.


Using the Platinum Embossing Enamel, cover one of the Daisy Earrings and the Daisy Accents. When cooled, attached the word piece using the jump ring to the earring.

Add bits of washi tape. Then using the Adhesive Fluid and the Embossing Enamels, cover small areas of the clip and board and the edges. NOTE: the metal clip gets very HOT when heated.

Let cool completely.


Attach the flowers and earring using the E6000. A little goes a long way...


 Attach the Bling using the 1/8" Super Sticky Tape.


Don't forget to stop by the Globecraft & Piccolo blog every day to see more inspiration from the G&P Design Team!

Inky hugs,
Angi

Monday, April 7, 2014

Globecraft & Piccolo - Graffiti and Gears (aka the card that wanted to go steampunk)

Happy Monday, G&P Friends!


I have a girlie glam kind of card for you today! I started with the gears and thought I'd go steampunk (seems that Sandy and I were sharing some creative vibes!), but as you can see, this card went in a different direction...

Here are the supplies you'll need:

Globecraft & Piccolo

Background Stamp with words
Rose Red Seam Binding
Assorted flowers
Corrugated Cardboard
Picket Fence Distress Stain
Vintage Photo Distress Ink


The bling on a roll is so easy to use! It's faux bling that comes 'stringed', so you can cut it to size. It's so sparkly! You can use alcohol based markers, such as Copics to customize the bling to match your project and 1/8" Super Sticky Tape to adhere the bling.


The Mardi Gras Embossing Enamel is such a lovely steampunk/vintage mix - burgundy and gold. The various sized particles really worked with this design giving it depth and texture right where it was needed!


The Accents are easy to color with 3D Enamel Gels or embossing enamels (or any other coloring medium for that matter!), but I decided to leave them natural.


And a bit of Embossing Enamel splatter using the Mardi Gras! See the spots of gold?

Thanks for stopping by today! See you tomorrow for a project designed by Tracy.

Inky hugs,
Angi